SMAC - Alpha Centauri: Strategy Guide
- @for Gamers
- @author Kai Ruhl
- @since 2007-09
Abstract
Sid Meier's Alpha Centauri (SMAC)
is my favourite among the turn-based strategy games. It takes all the
goodness of the Civilization
series and and adds the unique capability to freely configure your
(military and civil) units, adding some more interesting options. For
some time, Alpha Centauri was also available in a Linux version, ported
by now defunct Loki Games.
In the following, I will describe what I have found out about
strategic gameplay (reading several texts myself, of course). This is
necessarily an incomplete and subjective list, but includes issues
rarely found in other guides, such as terraforming. Maybe you get some
ideas while reading this. Enjoy.
Acknowledgements
All images taken from aliencrossfire.civ3.de
with permission. All copyright by Firaxis
Games. Additional advice by
gamespot.
Useful description on
Wikipedia.
1 Factions
Usually you choose your favourite faction according to your
envisaged victory method and the terrain you play in (where "terrain"
also includes humidity and native life choices). I recommend always
taking custom rules and tailor them to your faction. Especially the
"steal tech when conquer base" option is making the game more
interesting.

University
Zakharov |
The university is the natural faction to play if you want a
long game, ending with ascent to transcendence. It is hard to survive
the beginning, but once you got the technological edge (e.g. you will
be the first one to develop jets) you can attack with superiour force.
You will also get to better base facilities and secret projects
earlier than the others.
You will very much want the Virtual World (automatic
hologram theater for your (automatic) network nodes) and the Hunter
Seeker Algorithm (immunity to probes, which you are prone to).
The university plays equally well on all kinds of maps. Set
research to "Discover" at the beginning to discover Secrets of the
Human Brain as the first faction, resulting in an research jump.
|
+2 Research
Network Node |

Peacekeepers
Lal |
The U.N. peacekeepers are also a faction for a long game. The
favourite way to win a game is by election to planet governor, or by
ascent to transcendence.
The talent knack means you can aim for a golden age in many of
your bases quite often. For this, the Human Genome Project (+1 talent)
and Clinical Immortality (+1 talent) are needed. Building the paradise
garden facility (+1 talent) also helps. For increasing chances at
governour election, consider The Empath Guild (+50% votes).
As for terrain, a map with much water is preferred, as this
decreases the chances to be attacked.
|
+1 Talent / 4
Double votes |

Gaian
Deidre |
The gaians are another faction for a long game. They are best
suited
for slow expansion and eventual domination by ascent to transcendence.
You will very much want the Weather Paradigm (-50%
terraforming time), the Pholus Mutagen (+1 morale for mindworms,
fungus bonus for all combat units), and the Xenoempathy Dome (+1 morale
for mindworms, fungus are roads). Later in the game, fungus will be
the optimal choice for farming (3/3/3) so have many formers ready.
Choose a terrain which has abundant native life; the capture
of mindworms will be your only military edge. Large worlds are
preferred so as to minimise enemy contact.
|
+2 Efficiency
+1 Planet
+1 Fungus |

Spartan
Santiago |
The spartans are perfect for an early conquest victory. As
soon as skunkworks can be built, their "no prototype cost" advantage
vanishes; until then, set research to "Conquer" and do exactly that.
Preferred terrain is a small world with little water, so that
the majority of enemy bases can
be reached without a ferry. Low humidity is also good because the enemy
cannot outgrow you fast and then use their superiour production
capability.
When playing a game, set game option "steal tech when conquer
base" to have more fun. Also, use a high difficulty grade so superiour
military really pays off. And get the university faction under control,
at any cost.
|
+2 Morale
+1 Police
Skunkworks |

Morgan
CEO Morgan |
Not played yet. The morgans are probably the best faction if
you want an economic victory. You would need to make treaties and pacts
with as many factions as possible, because you get more energy income
from it than they.
No idea which specific techs are useful.
A land based terrain with good contact to other factions, as
well as dry climate so that the others cannot outgrow you very fast,
and rare natural life are probably beneficial.
|
+1 Economy
100 Energy
Trade Bonus |

Hive
Yang |
Not played yet. The hive can produce better than any other
factions, and they are natural defenders, so "expand and hold" seems to
be a
good directive. Victory probably by conquest later in the game.
Specific techs: No idea.
Sea based terrain is probably good for someone who can defend
well and build colony pods and ferries faster than others. Also, small
worlds might be better for inefficency reasons.
|
+1 Growth
+1 Industry
Perimeter Defense |

Believers
Miriam |
Not played yet. The believers will probably always be
technologically inferior, so unless probes are discovered and the
university is a neighbour, there is little chance. Maybe an ultra-quick
conquest victory when the spartans are distracted by other engagements.
Any specific techs are probably illusory, since they must be
all stolen. On the plus side, probe ability is superiour.
Believers probably thrive in a low natural life (less
opponents) and humid (quick base and thus unit growth) environment.
|
+2 Support
+1 Probe
+25% Attack |
Advice for the factions I have played is probably more accurate than
for the other ones. In my opinion, the university is the strongest of
the faction, and I would always recommend playing them if you not
decided yet.
2 Base Location
The question of where to place your bases is one of the most
difficult, especially considering the "farming" radius around them. In
my experience, the following points should be taken into account when
pondering base location:
- Never plant bases on bonus fields, as this hinders future
exploitation.
- In mountainous areas, always prefer the west side (more humidity).
- Do not overlap farming fields, but keep your borders united.
Otherwise other factions can plant new bases in between. However when
in doubt, rather overlap than leaving too much space.
- Landmarks should generally be shared among several cities, with
the exception of the Garland Crater (+1 minerals), whose center base
can become a
prime secret project builder.
- If you have the Planetary Transit System (basis start with 3
people) take care that the surroundings support 6 nutritients,
otherwise starvation will instantly occur.
- I noticed a curious game-balancing effect: If 3 bonus fields are
farmable from one given base, one of them tends to vanish after 20
years.
The second question is how far to expand at first. This depends on
your effiency rating. After a certain threshold (the in game help even
tells you the formula) you get a energy penalty. In short, as long as
you have a healthy energy income, you can expand. Normally, the first
10 bases or so should be possible without penalty.
When expanding, I recommend to build a former, then a soldier, then
the colony pod. The former can start building roads toward the new base
location, the soldier can protect the former on its way out of the
radius of the producing base, and finally the colony pod follows.
Building the colony pod first would be more efficient but I deem it too
dangerous.
3 Landmarks
Landmarks are valuable to inhabit, especially the ones with minerals
or nutritient bonuses.
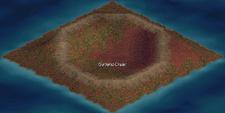 |
Garland Crater
The garland crater with +1 minerals in inner squares is the
most valuable landmark. A base build in its center can become a prime
secret project builder, as well as an excellent prototype builder.
|
 |
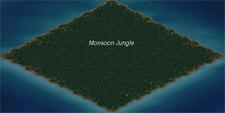 |
Monsoon Jungle
With +1 nutritient, this is the most important landmark at the
start. Monsoon jungle never has mineral bonus fields, but you can start
a special tactic: Build forest. Each has 2 minerals and 2 nutritient,
so you can grow fast and still have good mineral supply.
|
 |
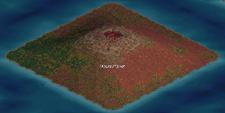 |
Mount Planet
Only the 9 fields surrounding the top are interesting. While
they do wonders for mineral and energy, you cannot plant farms or
forest on them, which restricts their usefulness. In rocky terrain,
mines can be good. Later, any thermal borehole is better than this.
|
 |
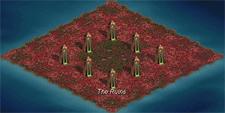 |
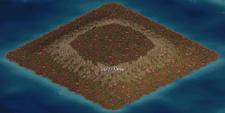
The Ruins
Each of the monoliths is a 2/2/2 provider, but it can get hard
to get to the center at first, where you should plant a base. Good
until late into the game, when extended wood farming or fungus farming
is possible.
|
|
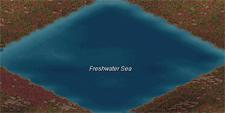 |
Freshwater Sea
Conferring +1 nutritient in each square, this advantage
vanishes when the sea is opened to the ocean through terraforming. The
spot is only interesting for bases that happen to be at the coast, as
the sea is no good for any military purposes.
|
|
 |
Pholus Ridge
The +1 energy on the ridge is only a minor advantage, but the
west side has good humidity and usually access to a coast. You can
build your primary marine coastline here.
|
|
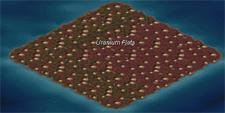 |
Uranium Flats
Again a +1 energy bonus, and flat land. Share among several
cities; one can never have enough energy.
|
|
 |
Geothermal Shallows
Even less interesting than the uranium flats, since you need a
sea base, which costs more to produce a colony pod for. Plant a base
into the middle if that makes military sense.
|
|
 |
Sunny Mesa
The sunny mesa is just very high. If you do extended
condensing with farm/solar combinations, this can be a good spot to get
energy. Share among several bases.
|
|
Landmarks are good reason for war. You should really have them, and
the others should not. If you make an invasion and must later
negotiate, try to keep bases in and around the landmarks (at least 3)
in case of a blitz invasion from there later on.
4 Terraforming
Depending on your faction, your research progress and your base
facilities, the way you terraform could have several goals:
Technological forming, forest forming (later) and fungus forming (much
later).
In general, I let the base manager decide on how to use the workers,
so I can see quickly which fields surrounding the base are most worthy
of farming. I deactivate all unit and facility options in the
manager, as they tend to be misguided.
Be aware that on some fields or facilities that seem just too good,
they are - at the beginning. You are restricted to 2/2/2 maximum until
you discover the following:
- Gene Splicing (B3) for farming more than 2 nutrient.
- Ecological Engineering (E4) for farming more than 2
minerals.
- Environmental Economy (B5) for farming more than 2
energy.
Particularly, thermal boreholes (0/6/6 at most) make no sense at all
before you have discovered the necessary techniques.
4.1 Technological Forming
The first kind of forming, which I refer to as "technological", is
effective in the beginning, but causes more and more environmental
damage later on. Based on farms, solar collectors, and mines, and
augmented by condensers and echelon mirrors, this is the method to go
at the start.
The general strategy I recommend is building farms and solar
collectors
on all fields that are "rolling & moist" or "rolling & rainy".
If something is arid (no nutritients) or flat (not minerals), plant
forest. Use condensers to make a patch of
moist patches rainy (it is usually not worth doing that for arid
fields). In
rocky fields, build mines and roads. You will see with the help of the
base manager whether you actually want to use the mines.
The following base farming values and improvements are possible:
 |
Arid field, no nutritient. Build forest. |
 |
A farm increases nutritient by +1 .
Suitable for "rolling & moist" or "rainy" fields.
Can be combined with solar or mine. |
 |
Moist field, nutritient.
Consider a farm when field is also rolling. Also consider using
condenser to make field rainy. |
 |
A condenser increases the humidity (and hence,
the nutritient yield) of its own and all surrounding fields by +1 .
Use on or at moist squares. |
 |
Rainy field,  nutritient. Prime
candidate for a farm. nutritient. Prime
candidate for a farm. |
 |
A mine increases minerals +3  in
rocky squares when combined with a road, but it reduces nutritients to
zero. Bad for farming, but very good for supply crawlers. in
rocky squares when combined with a road, but it reduces nutritients to
zero. Bad for farming, but very good for supply crawlers. |
 |
Rolling field, mineral. Build forest
when arid, otherwise consider farm and solar collector. |
 |
A solar collector increases energy by +1 , and
additional +1 per full thousand meters. Can be enhanced by an echelon
mirror. |
 |
Rocky field,  mineral, +3 with mine
and road, but those will reduce nutritient to zero. Cannot build farm
here. When rainy, consider flattening to reduce to rolling. mineral, +3 with mine
and road, but those will reduce nutritient to zero. Cannot build farm
here. When rainy, consider flattening to reduce to rolling. |
 |
An echelon mirror increases the energy of all
surrounding squares (not its own, unlike the condenser) by +1 . |
 |
River, energy. Good bonus if
you happen to nearby; faster military movement on rivers is another
bonus. |
 |
Thermal boreholes, with   yield, are the best
friend of any builder but cause massive environmental damage. yield, are the best
friend of any builder but cause massive environmental damage. |
 |
Monolith,  field, cannot be
enhanced by formers. Good to have nearby, especially in the beginning. field, cannot be
enhanced by formers. Good to have nearby, especially in the beginning. |
|
|
In the beginning, you need to build as many farms as possible on all
moist and rainy squares: Growth really is key here, as two workers just
farm twice as much as one does.
In the question of where to place condensers, I would recommend
planting them anywhere where possible, as the condenser field
itself becomes also more humid. Regarding echelon mirrors, the
situation is different; they do not generate more energy on their spot.
I tend to put them between two bases, so they can provide energy
bonuses to solars of both.
Mines on rocky squares appear very attractive at first but are only
useful for farming if the nutritient supply is stable and the base
already has at least 3 workers; otherwise I would always put priority
on growth.
If you have supply crawlers, the situation changes completely:
Crawl the minerals off the mines and farm nutritient squares from the
base.
Thermal boreholes should be used sparingly, as they raise the risk
of global warming considerably. I recommend building only one per major
base. If you must build many of them, consider the U.N. initiative for
global shade to counteract them. However this is very unprecise and
many new land bridges may appear and humidity could change rapidly.
Only do this if you have changed to a forest or fungus based farming
style (having Tree Farm and Hybrid Forest in most or all bases).
I do not cover sea farming here since I consider sea vastly
inferiour to land. While it can produce more nutritients, minerals is a
major flaw. Always build with some coastline in farming range, where
you can build a thermal borehole to get your basic mineral needs.
4.2 Forest Forming
Consider building forest on all bonus squares (nutritient, mineral,
energy). You get (1/2/1 +2), a total of 6, which you can only be bested
by a "rolling & rainy" square with farm and solar (3/1/1 +2) and
a total of 7 points.
Usually I prefer having a high mineral yield wherever possible,
so I always go with forest.
At the start, the 1 nutrient is pretty bad, so forest is only a good
idea in arid fields (where you really do not have much of a choice) or
in the monsoon jungle. Forest becomes better later on:
 |
|
Natural production. Use only on arid or flat
fields or when you need minerals. |
Available at start. |
|
|
With Tree Farm base facility. Better than
farm/solar or farm/mine combinations at this point of time. |
Environmental Economics (B5) |
|
 |
With Hybrid Forest base facility (which is
kind of expensive). Even better than monoliths at this point of time. |
Planetary Economics (B6) |
The Tree Farm facility really is the tipping point. Once you have
it, you can stop building farms (except when you want to grow really
fast on rainy squares) and build exclusively forest, combining them
with drilling for rivers to raise energy yield (remember that you
cannot drill adjacent to a river, though).
4.3 Fungus Forming
The number one thing to remember for fungus farming is that fungus
cannot have bonuses. This applies to both nutrient/minerals/energy
bonuses and to landmark bonuses. The second thing is that fungus
becomes useful only pretty late in the game:
 |
 |
Normally, fungus is useless, except when you are
Gaian, then it has always +1 nutrient . |
Available at start. |
|
|
Still useless at this point of time, except when
you are Gaian: Then this is better than arid fields. |
Centauri Ecology (E1) |
|
|
Still useless. |
Centauri Meditation (E5) |
|
|
Still useless, except when you are Gaian: Better
than "arid & rolling" fields. |
Centauri Genetics (E7) |
|
|
Now we are talking. If you do not have Tree Farm
yet, this is a real alternative to forest. |
Centauri Psi (E8) |
|
|
Not making it much better; also appears much
later in the game. |
Secrets of Alpha Centauri (D12) |
|
|
Serious forest replacement at this point of
time, unless you have Hybrid Forest. |
Matter Transmission (B13) |
|
 |
Unchanged situation. |
Temporal Mechanics (B14) |
|
|
Finally worth more than forest even with Tree
Farm and Hybrid forest, if you value minerals more than nutrients. |
Threshold of Transcendence (E15) |
In summary, unless you are Gaian, you will probably not use fungus
as a farming method on your own squares. What you can do, though, is
use fungus for some interesting military options:
- If you can plant fungus, this is considered a positive
terraforming activity, which means you can also do it on the territory
of your neighbours without breaking treaties.
- If you have the Xenoempathy Dome, fungus are streets for you, but
not the others: You can stuff uncharted territory with fungus to impede
colonisation by the other factions.
- As always, fungus is good for hiding your armies. It pays to have
a former near your attack force which builds fungus en masse at the
enemies borders.
All in all, fungus appears not as useful to me as it could be,
especially when compared to forest.
4.4 Additional Terraforming Advice
You can do some pretty mean things with formers, especially on enemy
territory. Raise land to bring your base to the west side of a mountain
(more humidity). Build an armored sea former and lower sea level before
your enemies base (this is considered hostile, and you should do it if
you are unable to conquer an enemy base). If you do not know what to do
with a former, drill for rivers.
In general, armored formers are very expensive. Do it only if you
expect mindworm trouble or if they are part of an attack army. Always
build formers with either fungicidal tanks or better, super former
ability. Later on, make them clean units. When building new bases,
consider sending a former ahead to build a road and some terrain
facilities.
5 Base Enhancements
When tending to the enhancement of your bases, I recommend
considering the following factors:
- Citizen growth and resulting drones
- Facilities and their benefits for the location and purpose of the
base
- Secret projects and their relative benefits to your strategy
In general, you should determine for each base what its purpose is
(e.g. military producer; secret project producer; general purpose
base), and then customise it towards this purpose.
5.1 Citizen Growth
On "transcend" difficulty level, citizen growth must be taken into
account very early on:
- 1 citizen: No problem.
- 2 citizens: One drone unless you have a military unit here. This
means that at this point latest you need to have a garrison, however
weak.
- 3 citizens: One drone unless you have Recreation Commons (B1)
- 5 citizens: One drone unless you have Hologram Theater (D2)
In particular, this means you should find the Believers as early as
possible and trade their research on Recreation Commons.
5.2 Facilities
The question of how you would want to enhance your base is really
taste dependent, and I cannot really say that my method is particulary
good. However, this is my standard procedure:
- Recycling Tanks (D1): Fast, and immediate reward.
- Recreation Commons (B1): If there is any growth, you
will need this quickly.
- Childrens Creche (E2): Basic, you need this. In slow
growth, build before Recreation Commons.
- Network Node (D1): If you have the virtual world, this
is as good as a Hologram Theater (D2).
- Tree Farm (B5): You need this as fast as possible to
advance to forest based farming.
- Biology Lab (E3): Averts planet blight and diseases,
whose occurence chances are higher if you have many bases.
- Robotic Assembly Plant (B9): Production is king at +50%
minerals. Same goes for Nano Replicator (B12).
- Everything thereafter depends on what you need most currently.
When thinking about how I do it, I am still not sure about the
order, as I can find arguments for one way or the other. You need to
experiment.
When I enhance a base towards a special purpose (e.g. military unit
builder), I usually inject a Command Center (C2) directly
after Recreation Commons; same for Naval Yard (E4).
On a final note, as soon as you can build satellites, build mineral
satellites (Nessus Mining Station) en masse. This will help your newer
bases to get on par, so that they can start building military units
efficiently too.
5.3 Secret Projects
Whenever possible, you should build the secret projects that give
all your bases some facilities, as this is exceptionally valuable in
saving build time. The following base facilities can be gained by
secret project:
- Virtual World (D2): Hologram Theater for each network
node. Especially valuable for university faction.
- Citizen Defense Force (E3): Perimeter Defense. Besides
def bonus, deters enemies from attack.
- Command Nexus (C2): Command Center. Important especially
if you are in an attacking role.
- Maritime Control Center (E4): Naval Yard. Important only
in an ocean terrain.
- Cyborg Factory (C6): Bioenhancement Center. Important
for Gaians and other mindworm producers.
- Singularity Inductor (C15): Quantum Converter. The most
valuable facility, at +50% minerals.
It may be worth changing to Planned Economics while you build secret
projects; every mineral bonus counts in the race with other factions.
Also be sure that Recreation Commons (and later Hologram Theaters) are
in place before starting, so that no drone riots occur.
6 Unit Design
Military (and civil) units are freely configurable and one of the
most fun parts of the game. Designing units who have it all is
prohibitively expensive, so one should specialise. In the following, I
present my favourite units.
Keep in mind that bases can generally only support 2 units (unless
you have specific advantages) for free, more will deduct 1 mineral
production capability. The clean reactor (B5) ability remedies
this situation partially, but especially at the beginning mineral
availability may be critical.
6.1 Fast Base Defenders
Base defenders have little weapons, but the best armor possible.
With only a little more cost, you can given them rover (E1) or
better, tank chassis (B8). All bases should have at least one
of them for basic police,
the outermost ring of your empire two or more. The extended mobility
allows the units to drive to the next base within one turn.
Now somebody, at some point of the outer ring, attacks. Considering
your defense cars or tanks as a network, you can shift the whole
tapestry in one turn towards the enbattled base - while drawing def
cars from the next base, get reinforcement from the bases behind that,
and so on. This is true rapid deployment of defense forces.
One could think that fast base defenders become useless as soon as
magnetic tubes connect your cities. However in this later stages, you
will be able to build clean def tanks with ease, and can now also
defend non-base squares by moving your tapestry.
Later in the game, when your empire is more stable, upgrade one unit
per base to having the police (E3) ability, especially in the
inner bases, where the threat level is relatively low.
6.2 Super Former Car or Tank
Formers should have either fungicidal tanks (E4) or better,
super former (B7) ability.
Clean formers cost a lot so I prefer making my military units
clean instead. As long as you have fast base defenders, armor is not
necessary: Be sure to send a def car with every former that works
adjacent to fungus. Always use the fastest chassis (car/tank)
available, simply because a turn spent moving could be a turn spent
forming instead.
On oceans, I recommend to give sea formers armor. This way, when
somebody attacks your coast base, you can use them as def ships. Armor
is cheaper on ships as it is on land units, so it is pretty affordable.
Never disband formers, instead upgrade them to clean (B5)
units (later on, this is comparatively cheap).
Sometimes I consider giving these formers the air drop
(C6) ability, this is useful if you have a lot of small
islands when playing in a ocean terrain.
6.3 Supply Sentry
Supply (B3) crawlers (and cars or tanks) are a valuable
addition to the welfare of a base. They become even more valuable when
outfitted with deep radar (C4); this way, they serve as a
mobile sentry in the outskirts of a base. If you can afford it, provide
them with armor: A first line of defense to block the roads for
incoming opponent forces.
Do not be afraid to build supply crawlers due to the increased cost
for the base: Each crawler planted on a forest square brings home two
minerals per turn, while costing one; with mines, the ratio is even
better.
6.4 Fast Probe Cars and Ships
Probes (D2) should always get the fastest chassis
available. One turn really decides your fate.
I also recommend building probe ships when going to explore,
because you can do spionage on any opponent base,
however far away, and return immediately home afterwards. This is one
powerful way of one-way teleportation if you happen to need your probe
ships at home (e.g. for defense purposes).
6.5 Fast Attackers, Fast Defenders
You can do large-scale attacks two ways. The first one is classic:
Build slow, heavily armed, and heavily armored troops. This works well
if you have time, and when you want to swarm the landscape, because
they can defend themselves. If you manage to get them elite, they will
also double their movement, equalling them to cars.
The other one is to build fast attackers, fast defenders. A fast
attacker is a car or tank with optional artillery (D2) and
little to no armor.
The fast defender is one of the def cars/tanks described above.
Additionally, you should always have a def car with AAA (C4)
ability as soon as the enemy has aircraft.
The disadvantage of this approach is that you need to have them
always on the same square, allowing collateral damage if the enemy
attacks successfully.
The advantage is that now, you really can do blitzkrieg.
6.6 Attack Copter
Copters (C6) are the backbone of any strong attack in
medium stages of a game because they can attack multiple times, making
them ideal for taking out probes and formers before attacking the
original target. I recommend to land them at the end of each turn, and
therefore design them with maximum weapons and no armor.
In sea based terrain, fill a carrier (E8) ship with one
marine (E4) infantry (for taking an enemy base directly from
the ship), two air superiority (E5) copters (more if the
opponent has strong air forces), and the rest with attack copters.
Flank the carrier ship with at least one attack ship.
In the middle term, this strategy will force the opponent to build
many AAA (C4) units. If this has sufficiently progressed,
change back to a land based attack strategy and deploy the copters to
destroy enhancements and civilian units.
6.7 Air Attack, AAA Defense
Personally have not tried it yet, but found it intriguing when
reading on civ3.de
(german). You need two aircraft and one AAA defense unit to pull that
trick:
- Put the AAA (C4) unit wherever you want it.
- Alternately, put the aircrafts (E5) on the same square.
This way, you always have an aircraft and an AAA defender on the same
spot.
- If the enemy wants to attack you, he needs an air superiority
(E5) unit, because there is an aircraft on the square. Only
aircrafts can have air superiority, so he needs to build one.
- As soon as the enemy aircraft attacks, our strongest unit will be
chosen as defender. That would be the AAA defense unit, giving +100%
and another +50% because air superiority units are exceptionally bad
against ground units.
Should be nice.
7 Military Campaigns
Planning and conducting a military campaign depends on the enemy,
but there are common elements to each large-scale attack:
- Base attack units (normally infantry)
- Land artillery (especially if the enemy has some)
- Land and sea probe teams
- Sea tanks for absolute naval superiority
- If aircraft already researched, air superiority
To begin with, a decent infantry (or the "fast attackers, fast
defenders" approach described above) are the backbone of any attack.
Keep in mind infantry can move two steps when in elite rank. As a side
curiosity, do not change the support base of an elite infantry: This
will subtly decrease their rank from (+) to (-)(+), reducing their
movement to one step. You need to have one full step in reserve when
attacking: Otherwise this will count as hasty attack (at least -33%).
Artillery is a must before attacking enemy bases, and to destroy any
sensor arrays (+25%) if the enemy has some. When building artillery,
only attack value is necessary, and no armor. Car based artillery is
worth its (high) price if you build them in your home bases; if you
start to build in conquered bases, I recommend taking infantry
artillery instead, as they will be ready much faster.
Only land-based artillery can fight to the death; sea based will
stop after a few shots. If the enemy has an artillery in the base, do
not stand within its reach when attacking; even if you attack e.g. a
land field around the base, they can shoot back. The same principle
applies when attacking land enhancements from the sea.
Use agents to destroy base facilities of your opponent. Especially
recreation commons and hologram theaters are good targets, because the
resulting drone riots will hinder the base from producing military
units effectively. Also have sea probes for ocean bases and for
subverting enemy naval units when in danger.
Speaking of which: Achieve naval superiority by having enough sea
tanks (weapons and armor). Your whole attack is probably doomed if the
enemy can destroy your ferries. Destroying enemy ferries is also the
cheapest way to decimate his military. If there is a situation where
you lose a section of the sea, rather use sea probes to buy the enemy
ships than losing control over the sea.
Aircrafts make everything harder, because they are so very flexible.
If you can foresee aircrafts will be researched soon, build at least
half of your military units with AAA tracking. In case you are the
lucky guy with aircrafts first, you will have a fun 20 years of total
air superiority. This is the best time for a large-scale attack.
Conclusion
With some luck, you might have been able to get a few good ideas
while reading this article. If you happen to discover a neat trick or
two, I would like to invite you to contact me using smac at the
above domain as email. In any case, thanks for leaving a part of
your attention span here, and have an alpha day!
EOF (Sep:2007)