MilkyTracker [docs] is a chiptune music app for Linux, Mac and Windows. Playing and editing xm, s3m or mod files e.g. from modarchive is a good way to explore tracking [bassoon].
After apt-get install milkytracker, start the app and
be greeted by a somewhat overwhelming screen.
Apart from the command section top left, we have instruments/
Ok, so how do we make sound? We load a wav sample (e.g.
say "wow" into a recorder app) by going top-right to Samples→Ctrl+Alt+S) aka sample
editor, which opens at the bottom.
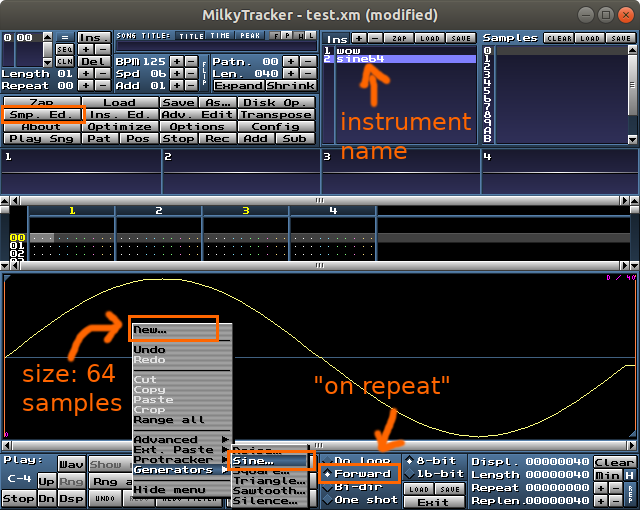
RMB into the empty space, and choose New with 64
samples to create our "sound canvas" with time (x-axis) and
volume (y-axis). More samples will stretch the wave and
thus make the sound lower. Then RMB again to
Generators→
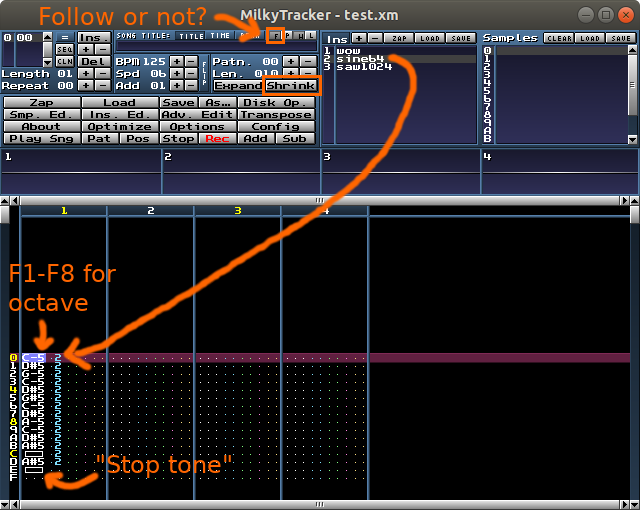
To actually play a tone, press one of Y or the keys
right from it, until M: This our cdefgab, and the half
tones are on SD and GHJ in the row above,
mirroring what a piano
does. Note: German keyboard.

Also try Bi-dir instead of Forward, to go back
and forth instead of repeat, and notice how the sound becomes
"dirtier". And for a third instrument, instead of
RMB→
To further refine the sound, you could press the Ins. Ed.
(Ctrl+Alt+I) button for the instrument editor. Activate
checkbox On, then button Add for more control
points to the left, then move them by mouse for fine-grained
volume shaping. And Ctrl+Alt+X to get back to the main
screen.
Now that we can make a tone, next up is composing. At the top,
hit Shrink two times to get a manageable first recording
time. Pressing Rec (Space) makes the gray cursor
bar turn red, and from now on every tone should go into the first
track. Key 1 records as "stop tone", and cursor keys
navigate elsewhere for larger pauses. Shift+cursor
selects tones for delete (Del), copy (Ctrl+C)
and paste (Ctrl+V), with Shift+Alt+cursor to
extend the selection.
Hit Space again to get out of editing, Play Sng
(Enter) to start replay, and Stop (Esc)
to stop; alternatively Shift+Space for tone-by-tone
debugging. The middle bar shows waveforms, and you can LMB
on any of them to (un)mute, useful for listening to track
decomposition. While editing, you can also Tab
through the tracks and Shift+M (un)mute them.
Now to the notes: Something like "C-5 2" means C on octave 5 (on
0..7, reachable by F1-F8), with instrument 2
(cyan),
here "sine64" in the instrument panel top-middle.
Each detail can be edited: Note down (Shift+F1)
or up (Shift+F2) by a half tone, as well as instrument
down (Ctrl+Shift+ß, right of 0) or up (Ctrl+Shift+',
two right of 0).
Combined with copy&paste, you can duplicate the first track, then change the instrument or octave (12x note up or down), or transpose to the fifth like in a power chord (7x note up/down). Tricks like these can make the sound appear "fuller" in our ears.
You might have noticed the columns are not quite full: We are missing volume and effects [png] yet. Volume (green) goes into the column after instrument and effect (pink+yellow) in the column after that.
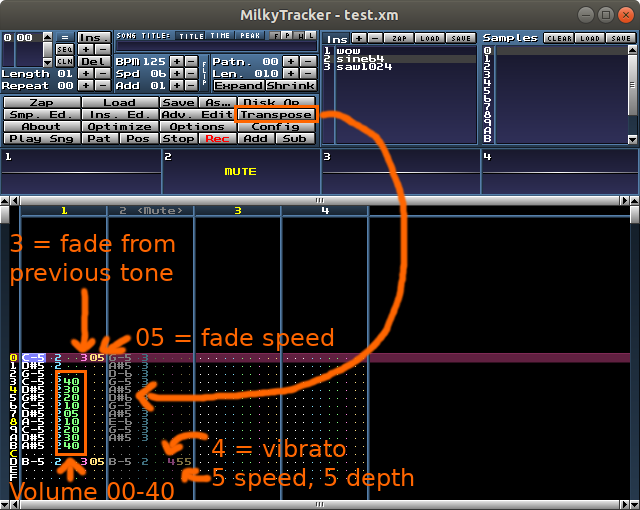
Effects [docs] [guide] are e.g. 3 for "fade from previous tone" [docs] and have parameters, e.g. 05 for fade speed. Note that I removed the stop tone so there is actually a tone to fade from. Volume is a number from 0 to 40, with default 40, and can be set either as absolute number or +/-, with +F the maximum increase; also usable as volume effect [docs].
The (muted) track 2 shows a copy of most of track 1, but with different instrument and transposed by +7 half tones. At the end, a second effect is 4 for vibrato [docs], with the parameters 55 defining weak or strong vibrato.
A musical piece contains a lot of sheets (patterns), and so far we have had only one sheet of 0x10 or 16 notes, with the default 0x40 notes. At the top left is the sheet management, where you see sheet 0 with id 00. Use Ins to add another entry 1 and +/- to define which sheet will be played there.
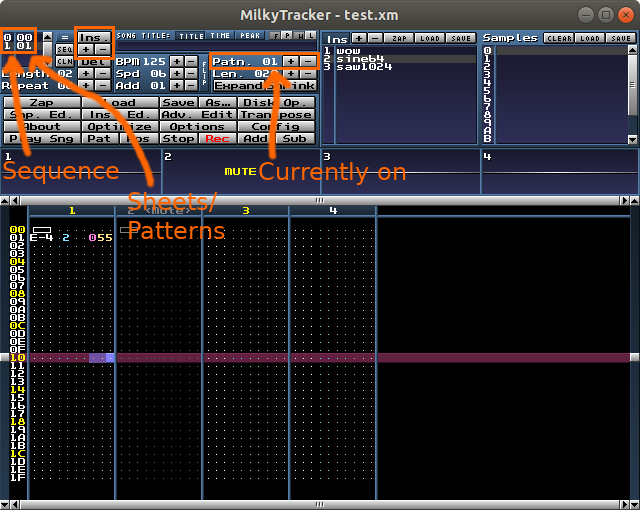
For editing, use the top middle Patn. +/-
buttons to change which sheet you are on. Within the sheet in edit
mode, press F9-F12 to jump to first to fourth
quarter of a sheet, and Shift+F9-F12 to play
from that quarter.
Also, the CLN (clone) button is a nice alternative to Ins: It copies the current sheet to a newly created one. Just like SEQ (sequence), the id of the new sheet is the next free one.
And if you are this far, consult the docs and faq again to see what else is possible...
MilkyTracker is quite a fun way to create or just listen to music while letting the notes dance in your eyeballs. Have fun, and happy composing!
EOF (Jan:2024)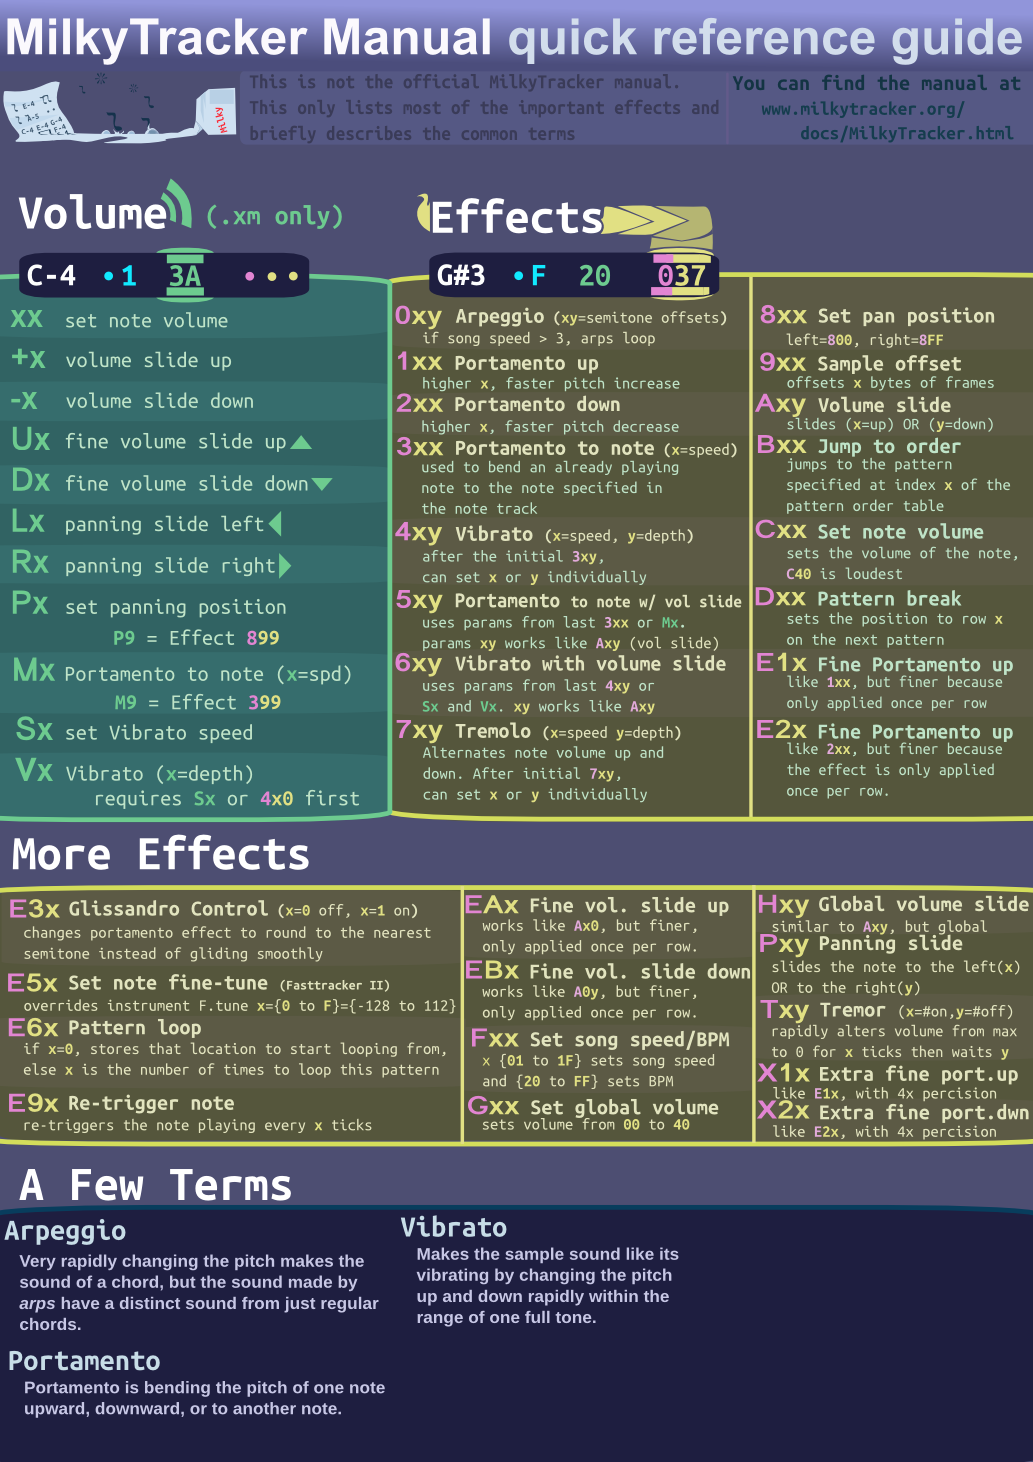