Blender [home] is a 3D modelling tool that, surprisingly, can also be used for video editing. It is not as full-fledged as e.g. Adobe Premiere [home], but it runs on Linux and is open source. Together with ffmpeg [home] and mplayer [home] for video, and Audacity [home] for audio, it suffices for most paper submission videos.
Download the latest Blender version (in 2011: 2.5.x) [download] and unpack it somewhere in your user directories. It comes with ffmpeg included. Start it with ./blender and you are ready to go.
The mplayer [docs] and Audacity [docs] packages should be available under Ubuntu.
apt-get install audacity mplayer
And that would be it for installing.
It is good to be organised with your clips. In Blender, it is safest to work with png frames for video and with wav snippets for audio. Create a suitable directory structure, delete frames that you dont want, and cut the sound as you see fit. To turn any avi/mpg/whatever file to png, create a new directory, go into it, then do:
mplayer -vo png ../<your_avi_file>
... which will get you 00000000.png to 99999999.png or similar. If you want a specific timespan from the video, try:
mplayer -vo png -ss <hh:mm:ss> -endpos <hh:mm:ss> ../<your_avi_file>
where instead of a time 23:59:59, you can also specify seconds as floats, e.g. 10.5. Note that the times will be slightly off for most of the times, because extracting starts and stops with a keyframe. Leave some leeway, then delete what you do not want.
Regarding fonts: There are no fonts in Blender! So you need any text that you want as PNG images.
Lastly, for audio, load your recording with Audacity [tutorial], cut it, and save into smaller files.
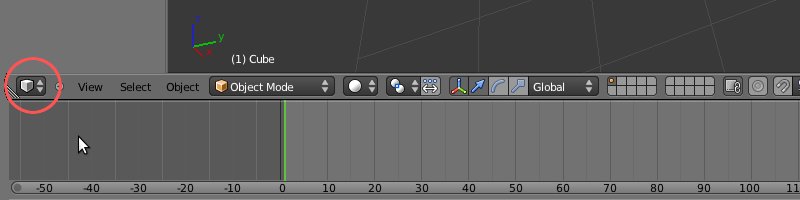
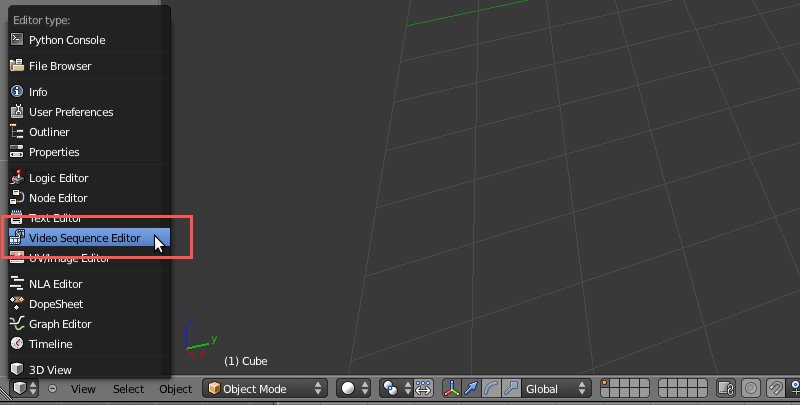
Start Blender and you will be greeted with the 3D view. This is not what we want, we want the VSE (video sequence editor).
In the lower part, identify the main window mode button. Click it and choose the video sequence editor.
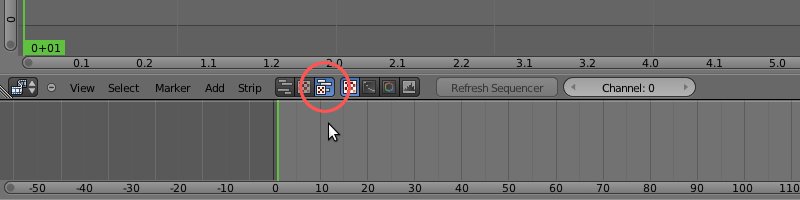
You will see a giant timeline, without preview. To see the preview too, enable the "both" mode as shown below:
And there you have it. Next, we go to the video settings panel, on the right side of the window. You can edit the length of the videos (start and end frame), and the format (choose MPG). Also, resolution and output resolution (default: 1080p input, but only 540p output, seen as 50%) can be modified here.
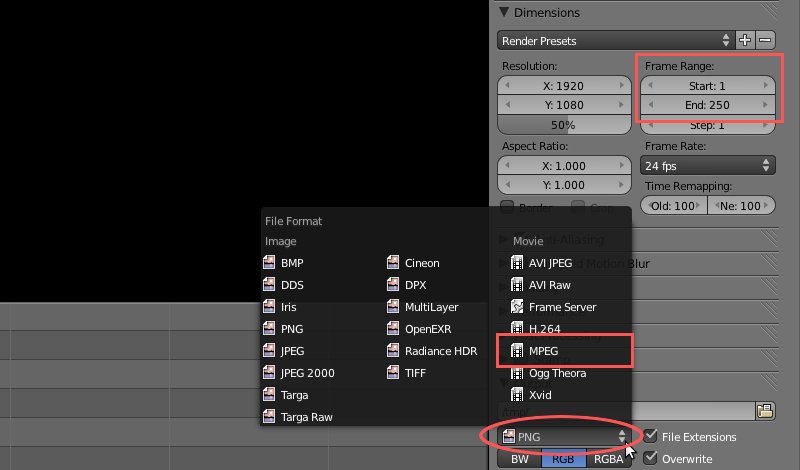
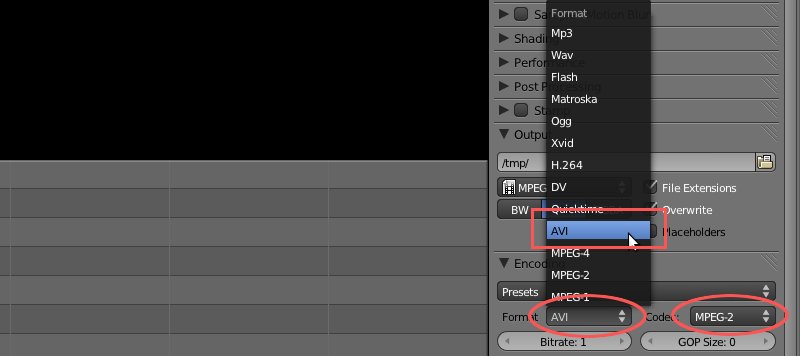
After choosing MPG format, a new section "Encoding" will appear below the "Output" section. Choose AVI as format and MPEG-4 (divx) as codec, as shown below.
With all the video encoding set, the audio encoding is just a tiny bit down below.
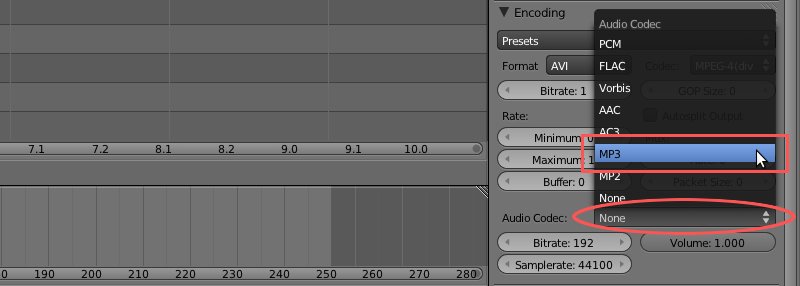
Choose MP3 and you are all done with the settings.
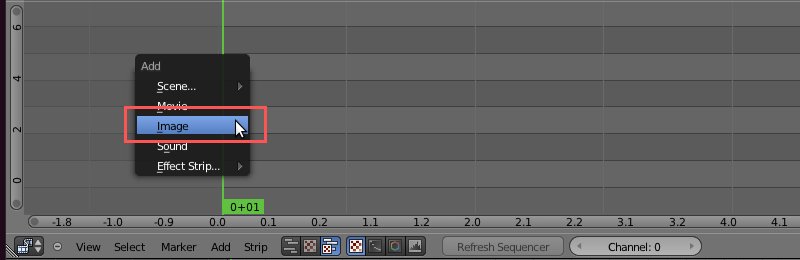
Ok, now to the compositing! Consider the timeline in the middle, which goes from frame 1 to 250. Hover with the mouse cursor over one of the lines, near the frame where you want to be at, and press Shift+A (yes, you need to memorize this key). The "Add" menu appears, and you can either choose a still image (or several ones, by dragging a mouse rectangle or by pressing A for all -- the images are interpreted as one movie), a movie file, or a sound file.
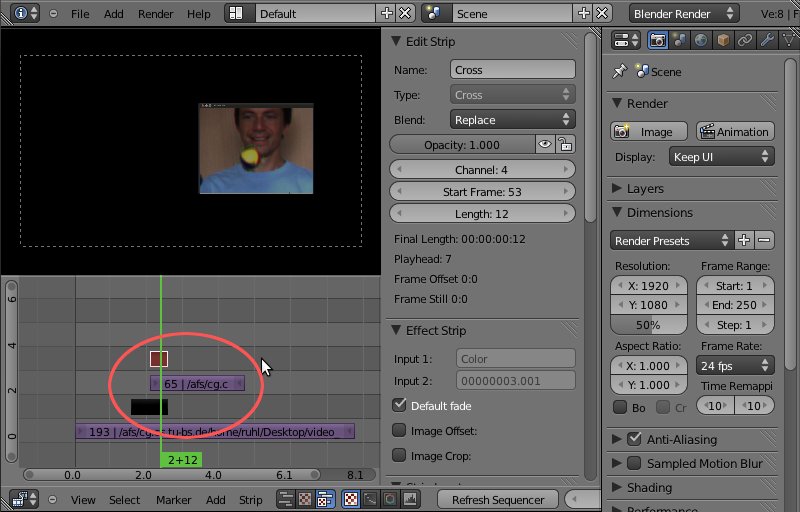
A new strip appears on the bottom, as shown below. Also, press N (yes, memorize) to get the properties of the strip on the right.
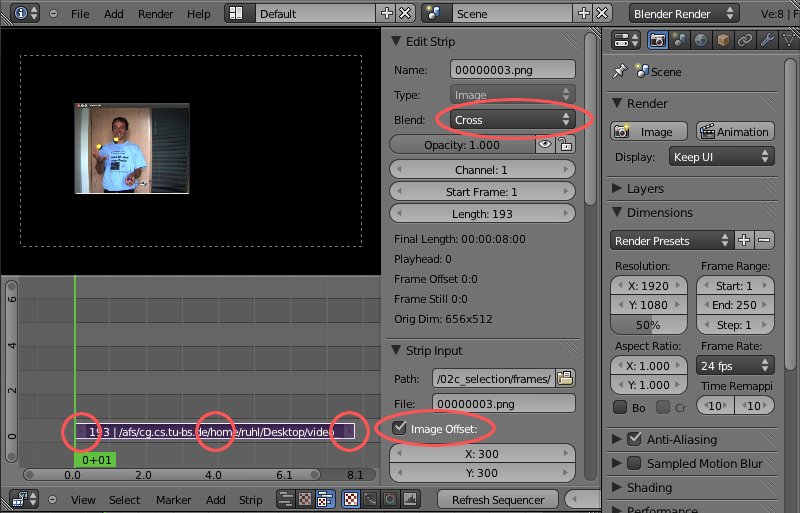
To select a strip, rightclick on its middle (left and right end are the handles for length). To move, press G for grab, then leftclick new location. Any new image or movie is initially stretched to full canvas (1920x1080 here, see right side "Resolution"). Activate checkbox "Image Offset" to keep original size, then use X and Y offset to position the image. If you have several strips stacked on top of each other (e.g. for compositing two clips), select the upper one and choose blending mode: "Alpha over" instead of "Cross".
To fade stuff in/out gracefully, you can use a "transform". Using Shift+A, create an "Effect Strip -> Color" strip and position it sideways below the clip, as shown below in black. Give it the same "Image Offset" as the clip you want to hide. Then, select first the color strip, and (with Shift held) the target strip, followed by Shift+A again, this time "Effect Strip -> Cross" (please note that the order of selection was important!). A new brown strip ("transform strip") appears above the common strip space.
But being a conglomerate of color, clip and transform strips, this does not alpha blend nicely with the first clip below. A good way to handle this is to make the 3 strips into 1 metastrip. Select all three (Shift, rightclick middle), and press Shift+G for meta strip; if you wanted to revert, you could press Alt+G to un-meta.
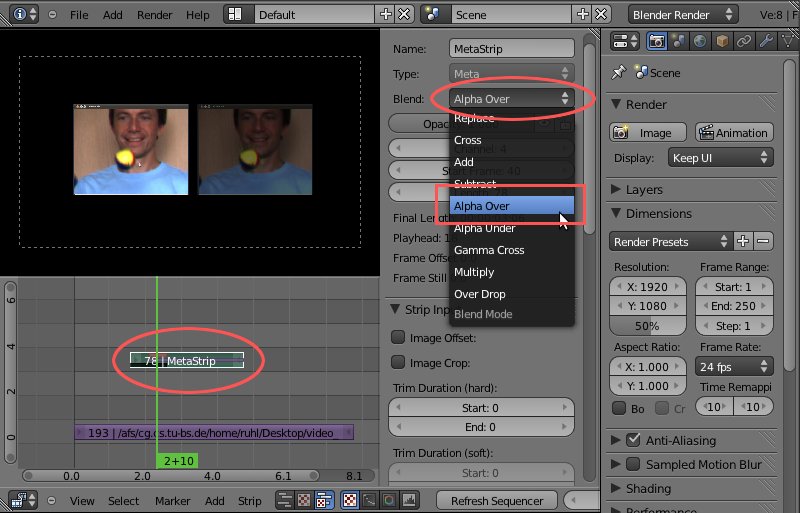
Now select the metastrip, and choose "Alpha over" as blending mode again. And voila! With these steps, you can already composite quite a nice paper submission video.
One last thing... you need an actual video file. So consider the right panel again. You may want to select "Keep UI" as display.
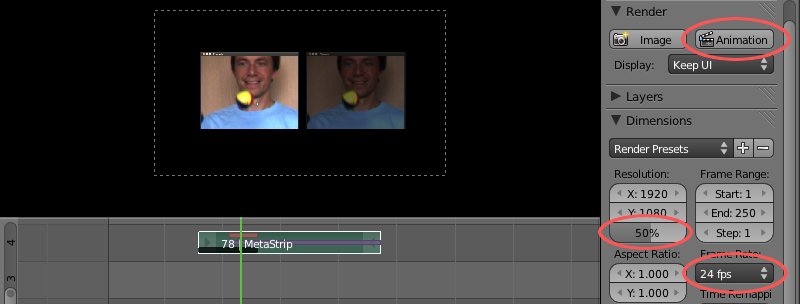
Consider one last time the resolution percentage of the output and the FPS (frames per second). Then, click "Animation" and in /tmp (or wherever you have set it in the "Output" section), a new file 0000-0250.avi or similar should appear after a short while. In the meantime, at the very top of the window, you will see a small gray horizontal bar.
Btw: If Blender says "Error initializing video stream", it is an ffmpeg bug. Just set output format to "H.264", press "Animation", stop the process, set output back to MPG, press "Animation" again, and magically, it should work this time.
And with that, you have your paper submission video! And this with Blender, who would have thought?
EOF (Sep:2011)